Last summer, my daughter saw a really cute plastic kayak that looked like a crocodile on the river. We looked it up, and it seems like it is no longer sold in the US ... having the thing shipped over from Germany was not an option. I had recently finished up my trapper build, so we decided to build our own kayak.
It took us a while to decide on which kayak to build. We ordered the plans for the Buccaneer 10-26 (with cut-out patterns! Worth every penny!) We cut out the patterns and glued them onto some 1/2" OSB, cut out the OSB. Then, on the recommendation of the more experienced builders on this forum, we used a batten and a trim router to smooth out the curves.
Then we had to figure out what we were going to build it out of. My buddy with a truck is stationed in SA TX for the next 18 months, so making the 90 mile trip to go get marine plywood was going to be difficult. I called and shopped all around locally, finding nothing, and we had eventually decided to go with the cheap 1/4 inch plywood from a box store.
That's when my father-in-law asked me to take a bunch of eastern cedar off his hands. He had cut them down years ago and had them sawn up into rough lumber 20 some years ago, hadn't done anything with it yet, and figured he probably wouldn't. That got us started thinking along the lines of a SS&G kayak.
I picked up the cedar boards on January 16 and brought them home.
SS&G Buccaneer
-
- Posts: 34
- Joined: Fri Nov 29, 2013 11:28 pm
- Type of boat I like: Trapper 15
- Location: NC, USA
SS&G Buccaneer
-------
Chris
Trapper 15-35
SS&G Buccaneer
Chris
Trapper 15-35
SS&G Buccaneer
-
- Posts: 34
- Joined: Fri Nov 29, 2013 11:28 pm
- Type of boat I like: Trapper 15
- Location: NC, USA
Re: SS&G Buccaneer
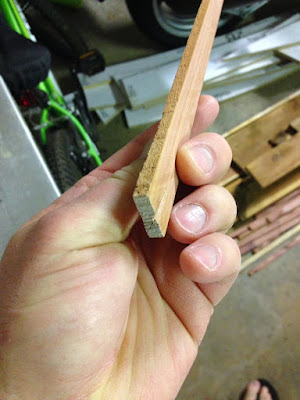
Borrowing my neighbors table saw, I cut some strips the same width as the marine plywood I made the trapper out of (slightly less than 1/4".
Then we glued up some of the smaller panels to see how it would go.
It was at this time I decided I would need to borrow my neighbors thickness planer and plane these boards down. They were not an even thickness, and while we were able to compensate with these smaller panels, we were not going to be able to do that with a 10 foot panel.
I sanded the panels.
Attached them to the pattern panels, and VERY SLOWLY cut them out with my trim bit router.
I did find out, if you try to go too fast, it will tear up the panel you just spent 24 hours waiting for the glue to dry.
Last edited by redbaron on Sun Jul 12, 2015 8:40 pm, edited 1 time in total.
-------
Chris
Trapper 15-35
SS&G Buccaneer
Chris
Trapper 15-35
SS&G Buccaneer
-
- Posts: 34
- Joined: Fri Nov 29, 2013 11:28 pm
- Type of boat I like: Trapper 15
- Location: NC, USA
Re: SS&G Buccaneer
After borrowing my neighbors thickness planer (great guy ... I did manage to pay him back some in April when they had a tree fall in a storm), I cut the strips in bulk, writing a number on each strip with a pencil. This is another trick I picked up somewhere on this forum, so that we could make the boat somewhat symmetrical. Every 10 strips was tied together with zip ties, and stacked away for later.
The table saw is pretty small, so made a platform on top of some 2"x4" saw horses to "extend" the table on each side
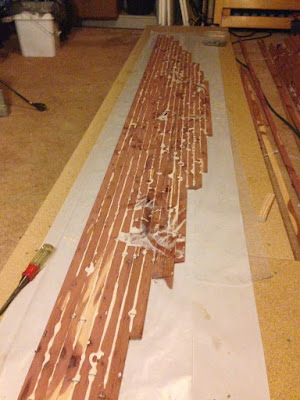
Then we began gluing the strips into shape.
I bought a 4'x8' piece of MDF, and had it sliced up into 4 2'x4' sections at the store, then I used some 2"x4"s to hook them together into a long table. Then we put a piece of butcher's paper down on the table, traced the shape from the pattern, and covered that with wax paper. Then we went to gluing and stapling. We used TightBond 3 wood glue. I spilled some of that on my driveway once, it took multiple pressure washings, and three years to finally come off. Ought to work for well for this.
This took a couple weeks, we could have gone faster, but this was during the school year, we had to work around homework, softball and dance practice. It's probably good that we didn't do one per night, as this was a bit hard on the fingers.
If I had to do it again, I would extend the strips about 9" or so beyond the end of the pattern. We only left 4"-6", and when I tried to use the thickness planer to smooth it all out, the snipe from the planer ate into the part of the wood that we were going to use for the boat. I didn't have this problem with the thicker wood, so I assume it was caused by the flex in the thin wood.
So, I had to use the belt sander, and then the orbital sander to smooth everything out. That worked out, because we needed sawdust later.
Last edited by redbaron on Sun Jul 12, 2015 8:43 pm, edited 1 time in total.
-------
Chris
Trapper 15-35
SS&G Buccaneer
Chris
Trapper 15-35
SS&G Buccaneer
-
- Posts: 34
- Joined: Fri Nov 29, 2013 11:28 pm
- Type of boat I like: Trapper 15
- Location: NC, USA
Re: SS&G Buccaneer
After sanding everything down smooth, we traced the pattern on the wood, and cut around with the jigsaw, trying to leave 1/4" -1/2" extra around the pencil marks.
We noticed a few gaps in the glue job, and a few spots where we had knot holes. We filled them in with some epoxy and sawdust mix, and sanded those areas again.
Then it was time to clamp the panels to the patterns, and get out my router with the trim bit. Again, it took a lot of willpower to go slowly here, because we were getting excited.
While I was doing the final cut, she was marking off the cleaned panels for stitch holes.
-------
Chris
Trapper 15-35
SS&G Buccaneer
Chris
Trapper 15-35
SS&G Buccaneer
-
- Posts: 34
- Joined: Fri Nov 29, 2013 11:28 pm
- Type of boat I like: Trapper 15
- Location: NC, USA
Re: SS&G Buccaneer
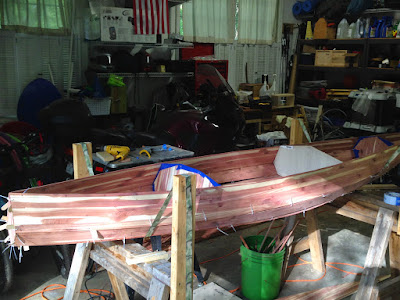
After drilling the holes, it was time to begin assembly! This was at the height of softball season and dance competitions ... so progress was agonizingly slow!!!
We stripped all the inside braces that will stay in the boat when completed
Then we got the popsicle sticks in as spacers, and the painters tape on so we could put begin tack welding the panels together.
Aaaaannnnnnddddd ... then we forgot to take any pictures for a while ... until we had all the seams filled, and sanded. Then we wet all the panels down to fill in the staple holes. We were very excited to see the colors pop out like this!
-------
Chris
Trapper 15-35
SS&G Buccaneer
Chris
Trapper 15-35
SS&G Buccaneer
-
- Posts: 34
- Joined: Fri Nov 29, 2013 11:28 pm
- Type of boat I like: Trapper 15
- Location: NC, USA
Re: SS&G Buccaneer
Next comes the fiberglass.
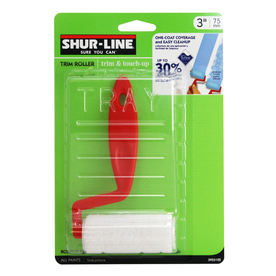
For whatever reason, the two times I have applied the fiberglass, I have a much easier time on the inside than the outside. BUT this time I stumbled across these beauties and I like them much better than the squeegee for epoxy (and I liked them for applying varnish later!).
Again, got slack with the pictures .. here we are with the inside glassed and the inside frames/braces installed.
We put a little hatch back behind where the seat will be. The shortest stainless steel screws they had were still too long, so I had to add some thickness.
We built a small box around this so she doesn't have to hunt for things we put in there.
And then it was time to start gluing the deck panels together.
Last edited by redbaron on Sun Oct 30, 2016 9:56 pm, edited 1 time in total.
-------
Chris
Trapper 15-35
SS&G Buccaneer
Chris
Trapper 15-35
SS&G Buccaneer
-
- Posts: 34
- Joined: Fri Nov 29, 2013 11:28 pm
- Type of boat I like: Trapper 15
- Location: NC, USA
Re: SS&G Buccaneer
I didn't take nearly enough pictures at the end of the build ... between that last picture and this picture, we glued the deck on, sanded the excess decking off, and applied fiberglass. Then we drew out, and cut out the combing, and glued that on too ...
Here's a different angle.
Aaaaand we're ready to take it to Grandma's house and test it out. If you look down on the floor, we are also making a paddle, but we are no where near complete with that yet. We're going to borrow a paddle for the test.
Ready to put in
I wanted to get a good picture of my daughter paddling, but by the time I turned around to get my camera, she was long gone!
Since then, we have varnished and attached two rope handles. Mom and Grandma also like paddling in it!
-------
Chris
Trapper 15-35
SS&G Buccaneer
Chris
Trapper 15-35
SS&G Buccaneer
-
- Posts: 141
- Joined: Fri Feb 25, 2011 4:26 am
- Type of boat I like: Kayaks and canoes
- Location: Fraser Coast, Queensland, Australia
Re: SS&G Buccaneer
I know I am a bit slow here but that boat is magnificent ! Bloody well done mate.
-
- Posts: 34
- Joined: Fri Nov 29, 2013 11:28 pm
- Type of boat I like: Trapper 15
- Location: NC, USA
Re: SS&G Buccaneer
Thanks Mick, I know I learned a lot from the builds you documented here.
Her grandpa was pretty tickled when he saw what we did with the wood he gave us.
-------
Chris
Trapper 15-35
SS&G Buccaneer
Chris
Trapper 15-35
SS&G Buccaneer