G'day Bruce,
Well done mate on taking the time to think about this and in finding your mistake.
They are very easy to make but fortunately, are all easy to fix if found in time.
You are going to love this boat mate and so are you Snaps. Bang for buck and effort in build, I reckon the Laker is the best value stitch and glue kayak on the market today.
I bloody LOVE my Laker and I just can't imagine ever having my shed without at least one of them in it. They really are that good.
Laker for a first timer
-
hairymick
- Design Reviewer
- Posts: 1965
- Joined: Wed Jan 04, 2006 8:54 am
- Type of boat I like: <-- Please read instructions to the left and delete this text. Then, tell us what type boat you like! :-)
- Location: Queensland, Australia
- Contact:
Re: Laker for a first timer
Regards,
Mick
JEMWATERCRAFT Swampgirl; Wadefish;Touring Pirogue;South Wind; P5 ;
Laker X 2, Sasquatch 16.5 T-V 15 Okwata 15:
Cobia 15 (under construction)
Mick
JEMWATERCRAFT Swampgirl; Wadefish;Touring Pirogue;South Wind; P5 ;
Laker X 2, Sasquatch 16.5 T-V 15 Okwata 15:
Cobia 15 (under construction)
-
Bruce36549
- Posts: 70
- Joined: Sun Dec 07, 2008 11:01 pm
- Type of boat I like: <-- Please read instructions to the left and delete this text. Then, tell us what type boat you like! :-)
- Location: Lower Alabama USA on Perdido Bay
Re: Laker for a first timer
Hi Mick,
Yeah, I seem to remember reading how much you like your Lakers. That's one of the things that motivated me to get started on this build. I really enjoy reading your posts. I'm already planning on starting an Okwata 15 after the Laker is finished, so hurry up and finish yours. I'm anxious to see what it looks like on the water.
Well, after putting the hull sides on her and struggling to get the floor panels to meet properly at the centerline, I decided I made the same mistake splicing the floor panels that I made with the hull panels. So yesterday I cut all the stitches, and cut the floor panels and re-spliced them. Today I managed to get both sides of the floor panels glassed so tomorrow I'll be stitching again. There's only a couple of days left before we leave on our trip to the Keys, so I won't have made as much progress as hoped before then. I'm still having fun!
I've been wondering how I'll manage glassing the hull. Never having worked with fiberglass before I don't know how much resin I can get rolled on the hull before it starts turning. How large a batch should I mix at one time? I've got 9" rollers that I'm going to cut in half to use on a 4" roller frame. I will have a 4 inch pan. I'm talking about the outside of the hull, the inside I expect to be doing in sections rather than all at once. Temperatures here in February when I will start this will likely be in the 60's F. Can I roll a fresh batch of resin over glass that is not fully wetted out from a previous mix that has started to turn? Right now it seems like I have a good 20 minutes working time with the RAKA resin and 350 hardener.
Bruce
I may look busy, but I'm only confused.
-
jem
- Site Admin
- Posts: 4916
- Joined: Fri Jun 18, 2004 8:14 pm
- Type of boat I like: Wooden
- Location: Greensboro, NC
- Contact:
Re: Laker for a first timer
I'd say for fiberglassing for a first timer, pump 3-4 pumps of resin and 1.5-2 pumps of hardener. Use it up, then repeat. Get braver with more mix at once as you gain confidence.... which will be pretty quick.
You can roll over epoxy at about just about any time. But it's best to do when pretty wet or tacky to dry. There's a point during the cure when it's gooey/sticky. Avoid that time period.
You can roll over epoxy at about just about any time. But it's best to do when pretty wet or tacky to dry. There's a point during the cure when it's gooey/sticky. Avoid that time period.
-Matt. Designer.
-
Bruce36549
- Posts: 70
- Joined: Sun Dec 07, 2008 11:01 pm
- Type of boat I like: <-- Please read instructions to the left and delete this text. Then, tell us what type boat you like! :-)
- Location: Lower Alabama USA on Perdido Bay
Re: Laker for a first timer
Hi Matt,
Thanks for the information. I feel a little more confident now about rolling over cloth that has been partially wetted by a previous mix. Should be no problem.
Yesterday I started tacking, and finished this evening. I'm very pleased that it went together so well after getting the floor panels re-spliced. Everything lined up nicely. There were some areas that required clamping to get the floor panels lined up with the bottom of the hull, but it was very minor and no problem dealing with. With luck I might just get the stitches pulled tomorrow night and finish filleting the seams. Looks a little sloppy in spots but it'll do for a first attempt. It actually looks like it might be a boat!
Bruce
I may look busy, but I'm only confused.
-
Bruce36549
- Posts: 70
- Joined: Sun Dec 07, 2008 11:01 pm
- Type of boat I like: <-- Please read instructions to the left and delete this text. Then, tell us what type boat you like! :-)
- Location: Lower Alabama USA on Perdido Bay
Re: Laker for a first timer
A final update till next month. I kind of rushed things to get the filleting finished before leaving tomorrow. Consequently it's going to take a lot of sanding. Also it took a while to get used to "injecting" the material into the seams neatly. Next time it will be a lot easier and neater.
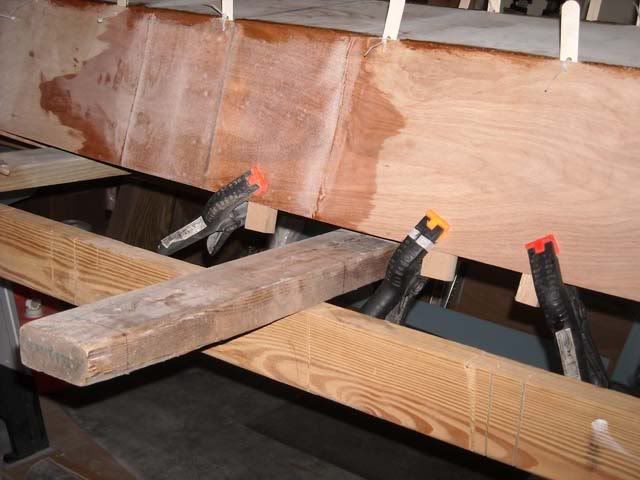
I used some blocking clamped on the inside of the hull to brace up the floor in a couple of places where it didn't quite line up with the bottom edge of the hull.

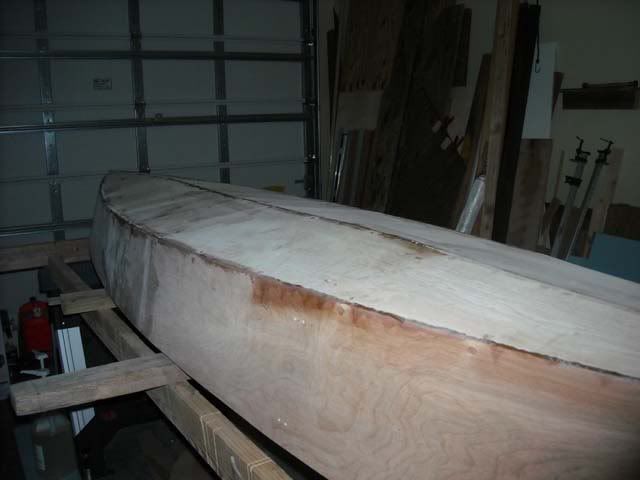
A view across the bottom of the hull to try and show a dip in the floor. Didn't notice it with all the tongue depressors sticking up until the filleting was cured.

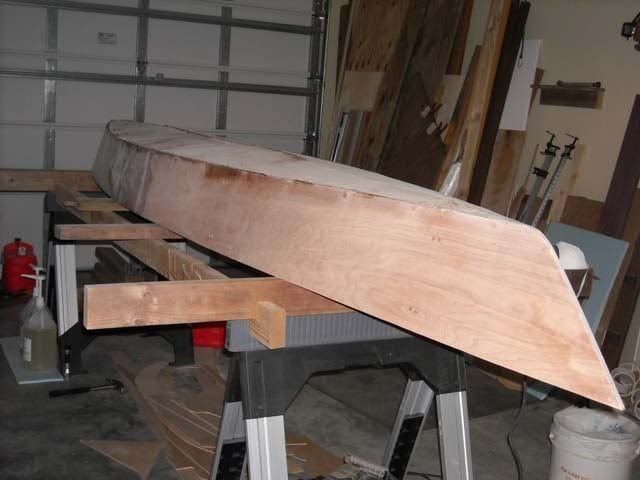
Another view across the bottom. Maybe the dip will be more obvious in this photo. Any suggestions on what (if anything) I can or should do about it? I'm inclined to just leave it be since I don't have a clue how to correct it.

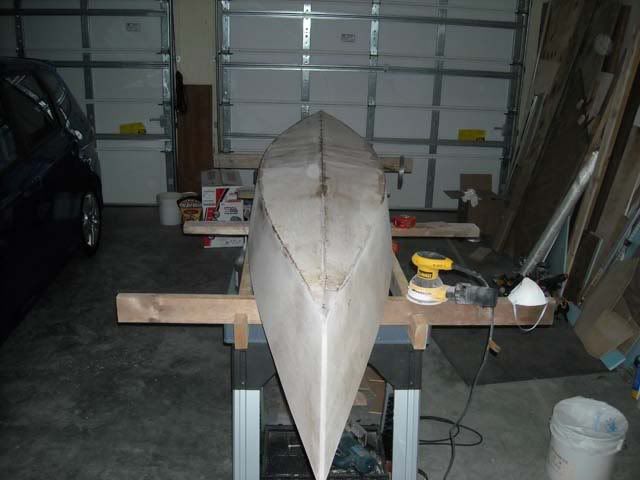
Finally a view from the bow end. Centerline seems to line up well and run straight for the length of the hull. Got just a little bit of sanding done tonight.

Be leaving early tomorrow morning and be in Marathon Key the end of the week. Then a week in Key West before returning home.
Bruce
I used some blocking clamped on the inside of the hull to brace up the floor in a couple of places where it didn't quite line up with the bottom edge of the hull.

A view across the bottom of the hull to try and show a dip in the floor. Didn't notice it with all the tongue depressors sticking up until the filleting was cured.

Another view across the bottom. Maybe the dip will be more obvious in this photo. Any suggestions on what (if anything) I can or should do about it? I'm inclined to just leave it be since I don't have a clue how to correct it.

Finally a view from the bow end. Centerline seems to line up well and run straight for the length of the hull. Got just a little bit of sanding done tonight.

Be leaving early tomorrow morning and be in Marathon Key the end of the week. Then a week in Key West before returning home.
Bruce
I may look busy, but I'm only confused.
-
Bemm 52
- Posts: 309
- Joined: Wed Feb 13, 2008 3:57 pm
- Type of boat I like: <-- Please read instructions to the left and delete this text. Then, tell us what type boat you like! :-)
- Location: Sydney Aust
Re: Laker for a first timer
Bruce re your dip..............
I had a similar problem on my Sabalo build along the centerline keel area not a lot but I see it
Didn't effect performance that I can notice
Cause is cutting more than the line or lofting out a bit........ once the fillets cure there is really no fix
pulling the panels togther tightly causes the line of the keel to go concave a bit.......hence dip
yours doesn't look to bad i wouldn't stress over it to much something to watch for in the future.


How do you keep your car from getting covered in dust?

I had a similar problem on my Sabalo build along the centerline keel area not a lot but I see it
Didn't effect performance that I can notice
Cause is cutting more than the line or lofting out a bit........ once the fillets cure there is really no fix
pulling the panels togther tightly causes the line of the keel to go concave a bit.......hence dip
yours doesn't look to bad i wouldn't stress over it to much something to watch for in the future.
How do you keep your car from getting covered in dust?
-
OnkaBob
- Posts: 401
- Joined: Fri Jul 18, 2008 10:12 am
- Type of boat I like: <-- Please read instructions to the left and delete this text. Then, tell us what type boat you like! :-)
- Location: Seaford, South Oz
Re: Laker for a first timer
Bruce, I can see the "dip" in your picture as it is very similar to what happened with mine. I know exactly what you mean about the spacers getting in the way - you can't really check the lines until you get all the obstacle out of the way and then it's too late!
Are you sure it's actually a dip - it could just be a flattening of the line. Have you checked it with a straight edge? If it is only a levelling out then it is probably not worth worrying about.
If you want to fix it then you need to cut the filler out in that section only and gently pry one panel up so you can put in slightly wider spacers before refilling. A small increase in spacer thickness will make a big difference to the height of the joint line. Have a look in my log thread for where I did similar and note Mick's comment about using a paint scraper as a lever. In my case it was still only tacked so was easy but it shouldn't be too hard even if yours is completely filleted.
Another thing I noticed is that your spacers appear to be sticking straight up parallel to the sides although I am not sure if this is really the case or if it is just the angle of the photo. It's my understanding they should divide the joint angle equally so the ply sheets meet corner to corner as shown in the instruction sheets. Anyone else care to comment on the importance of this?
I still reckon the figure / grain on your timber is fantastic and it's going to be a real looker when finished.
Cheers, Bob
Laker 13 - christened and slimed (just).
Laker accessories underway.
Laker 13 - christened and slimed (just).
Laker accessories underway.
-
tx river rat
- Posts: 989
- Joined: Wed Feb 21, 2007 10:48 pm
- Type of boat I like: <-- Please read instructions to the left and delete this text. Then, tell us what type boat you like! :-)
- Location: Tx
Re: Laker for a first timer
Bob
Just my 2 cents , on the Laker T-V and Cuda I didnt use spacers, they are all basically a v bottom perow, I set my sides down flat against the bottom flush the outside of the side sheet with the outside edge of the bottom, I then run a fillet inside sand the outside round and run cloth and glass inside and out. normally you paint the outside so sanding it round will not show sanding thru the grain of the ply.
My understanding for the reason we run a fillet is to round a corner where the glass cloth can lay.
That was 2 1/2 cents
Ron
-
jem
- Site Admin
- Posts: 4916
- Joined: Fri Jun 18, 2004 8:14 pm
- Type of boat I like: Wooden
- Location: Greensboro, NC
- Contact:
Re: Laker for a first timer
Spacers are an optional method during assembly.
Ideally, they angle they are on should bisect the angle of the 2 panels they are joining.
Ideally, they angle they are on should bisect the angle of the 2 panels they are joining.
-Matt. Designer.
-
OnkaBob
- Posts: 401
- Joined: Fri Jul 18, 2008 10:12 am
- Type of boat I like: <-- Please read instructions to the left and delete this text. Then, tell us what type boat you like! :-)
- Location: Seaford, South Oz
Re: Laker for a first timer
Thanks Ron, you've cleared that up. I wasn't sure if it was a cosmetic thing or affected the strength of the joint but now I know  .
.
Cheers, Bob
Laker 13 - christened and slimed (just).
Laker accessories underway.
Laker 13 - christened and slimed (just).
Laker accessories underway.